

How To Make A Filled 13 X 9 Cake
This post may contain affiliate sales links. Delight see my full disclosure policy for details
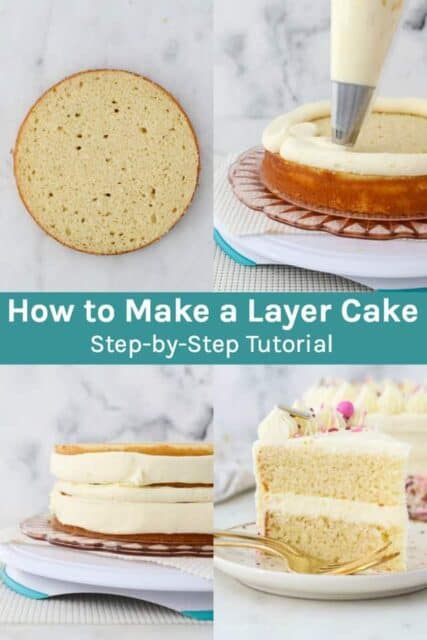
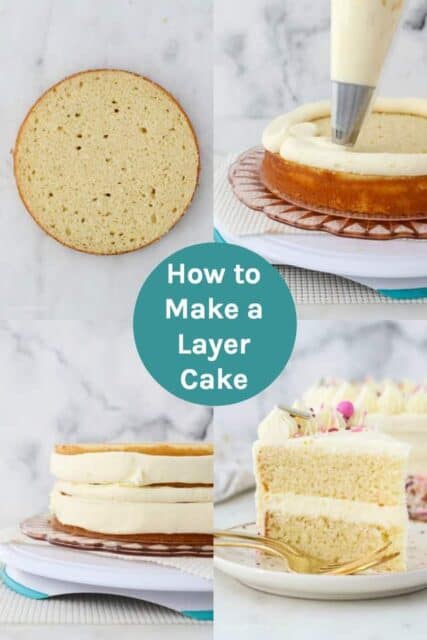
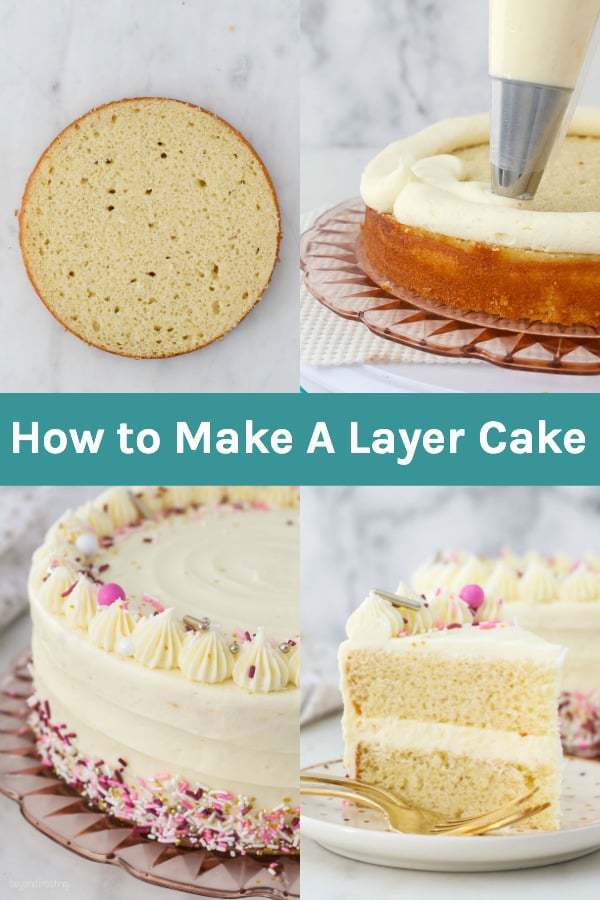
You'll love this quick and like shooting fish in a barrel tutorial to build a perfect layer cake. I'll show you how to fix the pans, level your cake and frost it besides. Whether you're a beginner baker or a more experienced baker, in that location'south always something new to learn.
I absolutely dear making cakes. There'southward no doubt about information technology, it'due south a labor of love, but there's nothing better than presenting that block to family and friends.
If y'all're a beginner baker, or new to making cakes, don't worry, I've been in that location too. Fifty-fifty though I took a cake decorating classes (over 10 years ago!) it's taken me years of do and many cakes and I've learned these tips and tricks along the way. In that location are so many truly talented cake decorators out at that place! I tin't wait to share these tips with you in this footstep-by-stride tutorial.
You can do this with a box of cake mix or using a recipe fabricated from scratch. I do notice that cake mixes tin can be difficult to work with considering they're so light and fluffy, it can be difficult to frost them without the cakes falling autonomously. Withal, it's totally doable!
Let's dive in.
How to make a layer cake
There are several steps involved in making a layer cake, I sympathise it can be overwhelming. Yet, if you intermission it down i step at a time, information technology's a lot easier to digest. It'southward usually been a two-day process for me. I bake the cake layers first and then assemble and frost the next day. I don't like the rush of the decorating as I am very meticulous with the details.
- Prepare the recipe
- Gear up and make full the pans
- Bake and Absurd
- Level (torte) the block
- Stack, Assemble and frost
- Decorate
I've gone into more details for each step of the process below.
How to Prepare the pans for baking
Grease and flour your pans: generously grease and flouring the pans to foreclose the cake from sticking. I prefer using Crisco vegetable spread as opposed to cooking spray, but if yous only accept cookie spray, definitely use that.
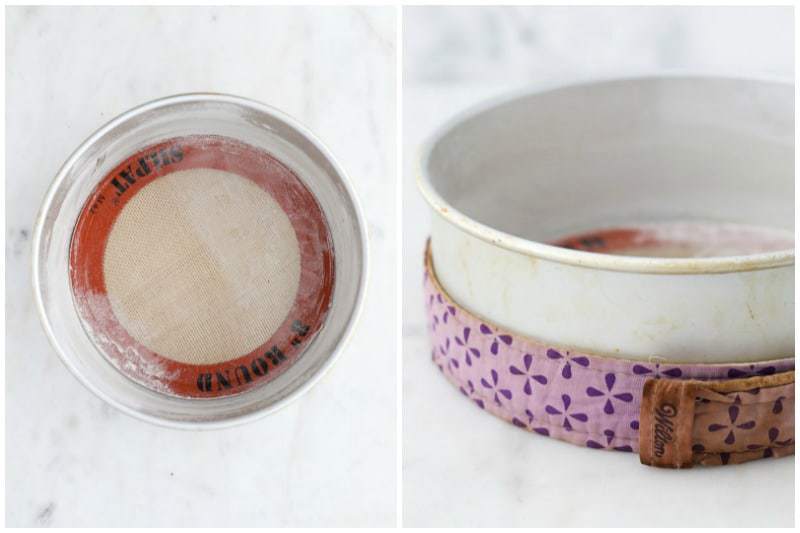
Line the pans: lining the pans with parchment paper or a round silicone baking mats will ensure there'south the cakes don't stick to bottom of the pans, and information technology makes information technology much easier to become the cakes out of the pans.
Bake Even stripes: I beloved using bake even stripes because it helps to broil the layers flatter. Without them, the edges of the cake bake quicker, forcing the centers to bake final, and therefore doming in the eye. You'll notice the outside edges of the cake are also a little darker without them. The broil even stripes should be Moisture when apply them to the outside edge of the pan.
How long do I bake my layer cakes for?
Blistering times will ever vary, and the time provided is a full general guideline. This is afflicted by both the type of pans you're using and your individual oven. This is true for any baked appurtenances, not just block!
Not all layers broil for the same corporeality of time, usually because the pans are not evenly filled. It'southward e'er best if you tin can take the extra time to measure out the liquid batter for each pan. Set up your timer for the minimum time suggested, check your cake and add additional minutes equally needed.
Know your oven. For case, I have a hot spot in my oven, so I similar to rotate my pans in the oven halfway through baking to ensure the layer bake evenly.
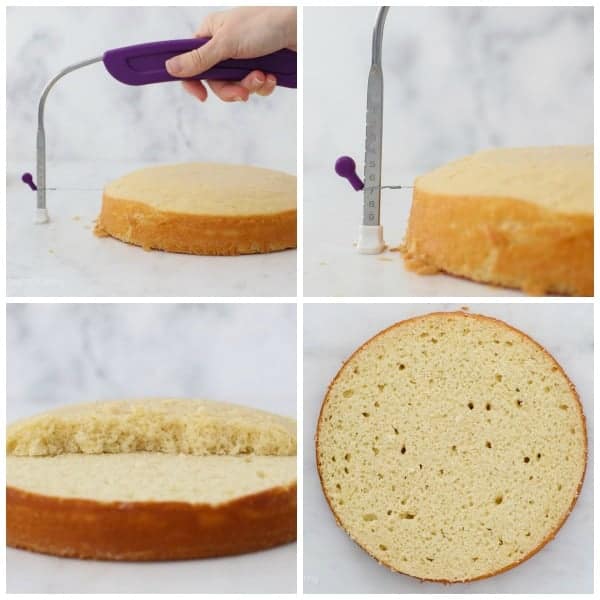
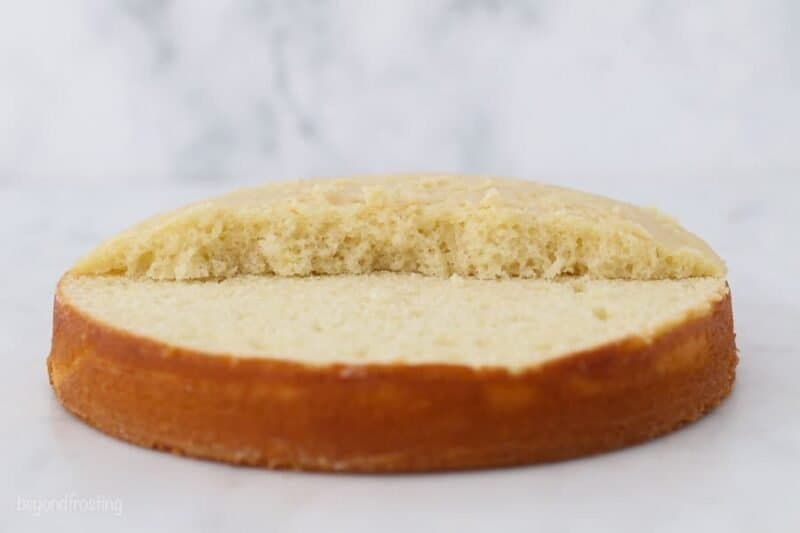
How to level (torte) a cake
Torting or leveling a cake layer means removing the dome on top of each layer so that you lot have a overnice, flat surface to piece of work with. This will prevent the layers from sliding effectually when stacked.
I happen to dearest my cake level tool, which helps ensure my layers are even. Otherwise using a serrated knife is all-time. Get eye level with your block and cut equally evenly as possible. Information technology can be difficult with a really moist block but exist patient!
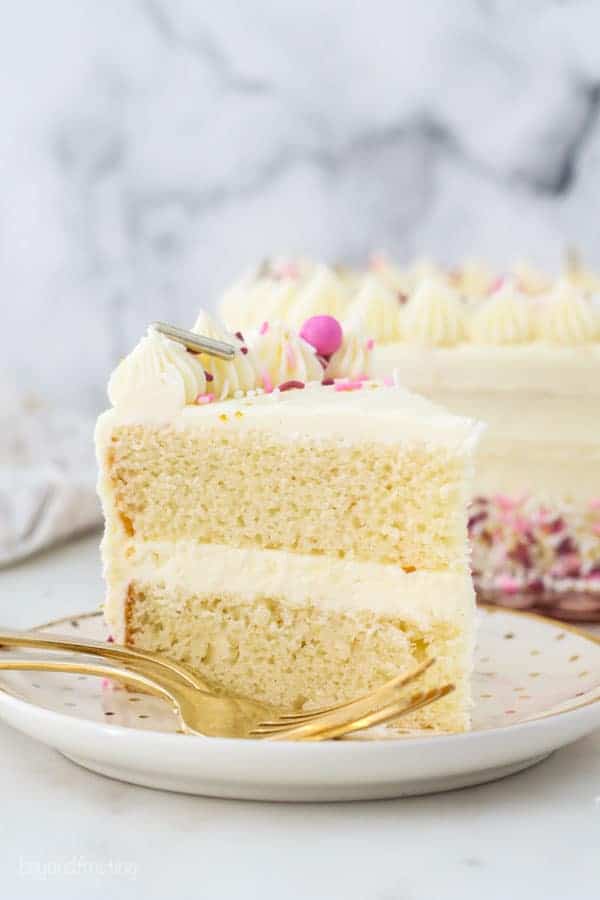
How to assemble and frost a layer cake
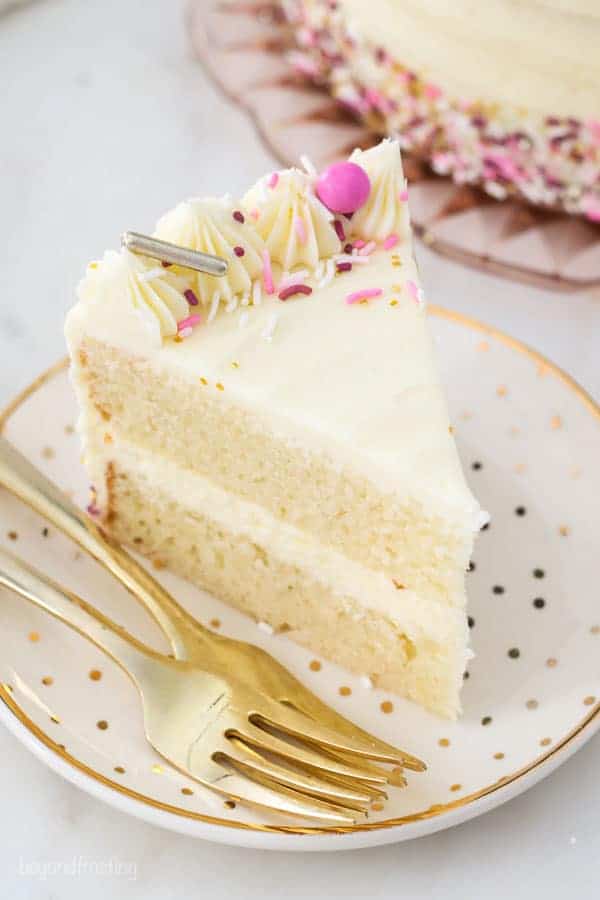
Once your block is baked, cooled, and leveled it'due south fourth dimension to frost. Evenly frosted layers and using a very stable frosting are ii of import factors in a stable layer cake. By following these simple steps, y'all tin can all the same frost beautiful cakes.
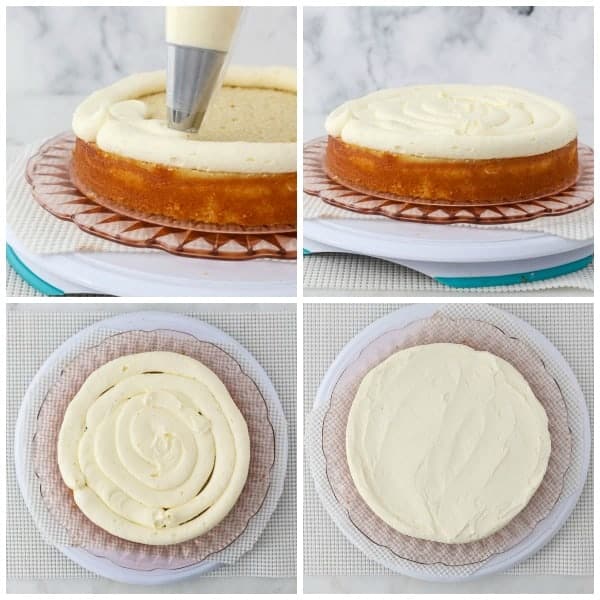
- Pace 1: Identify a dollop of frosting on a block board or the plate that you're stacking your cake on. This helps to forestall the cake from sliding effectually. Place the bottom layer middle on the cake board.
- Pace ii: Piping a layer of frosting using a piping bag to ensure it'south even (recollect nosotros want overnice, apartment layers!). Pipe from the outside edge into the middle. Y'all don't take to use a piping tip, y'all can snip off the finish of the bag besides. Utilize an angled spatula to polish it out.
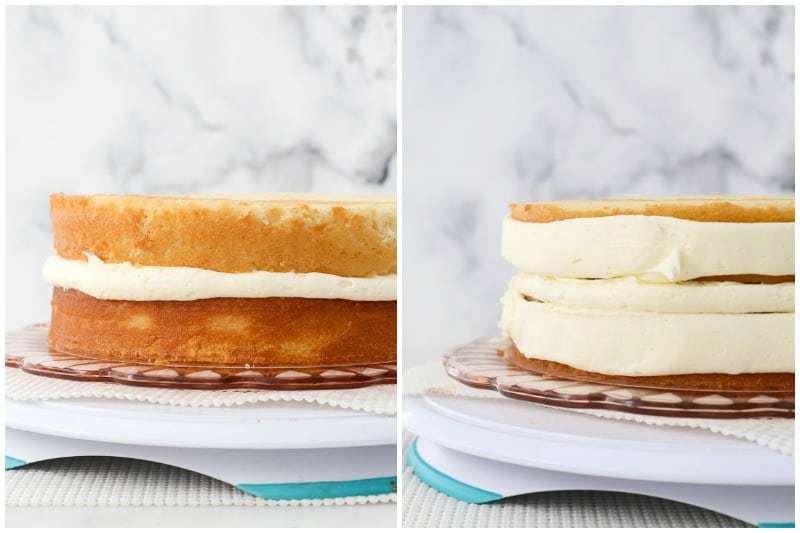
- Step three: Add your 2d (or third) layer and repeat calculation a layer of frosting in betwixt. One y'all're set for the superlative layer, I recommend inventing it, so the summit of the cake is the flattest it tin exist. You'll observe that will go out some gaps into between the layers. Don't worry, we're going to fix that.
- Step iv: Fill up in the gaps and add together the crumb coat. A crumb coat is a thin layer of frosting added prior to the last layer. The intention of the crumb glaze is to choice up whatever loose crumbs and so they don't get mixed into the terminal layer of frosting. Utilise your piping bag to fill in those gaps and proceed to spread information technology around to create the nibble coat. It's recommended to refrigerate the cake for 5-10 minutes to chill the crumb glaze. If you take any holes or gaps, fill up them in with the piping bag and rescrape. The crumb coating is optional but recommended.
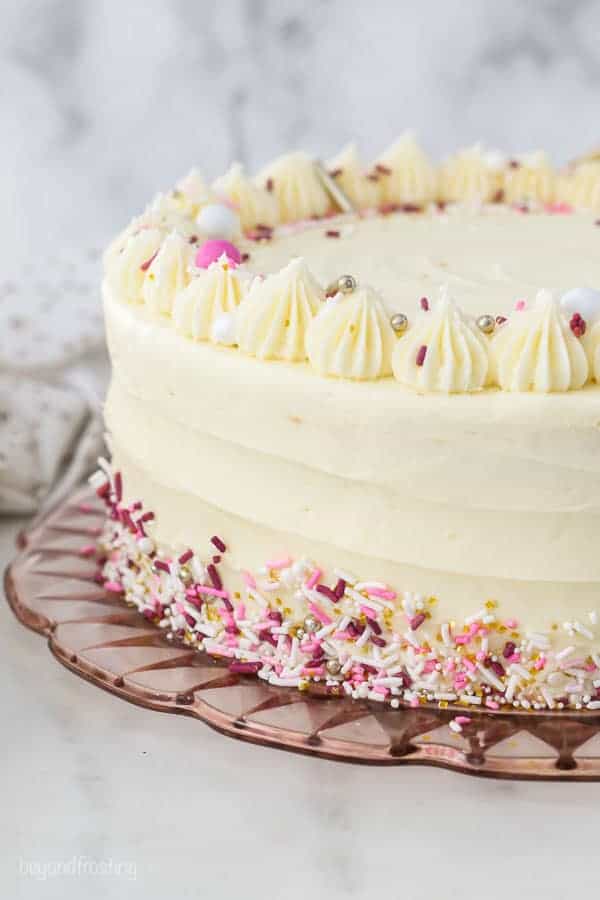
- Stride 5: Add the final layer of frosting. Y'all can do this by hand, but I find information technology's easiest to continue to utilise a pipe handbag plumbing equipment with a big open circular piping tip, or for larger cakes, I use my block icer tip- only note that this requires a lot of extra frosting.
- Step 6: Scrape it evenly using a cake scraper or angled spatula at 90 degrees or perpendicular to your cake. It's all-time to use a turntable to rotate the cake and concur the cake scraper yet. You don't demand to apply a lot of force per unit area and you'll likely brand a couple passes in order to go it nice and smooth.
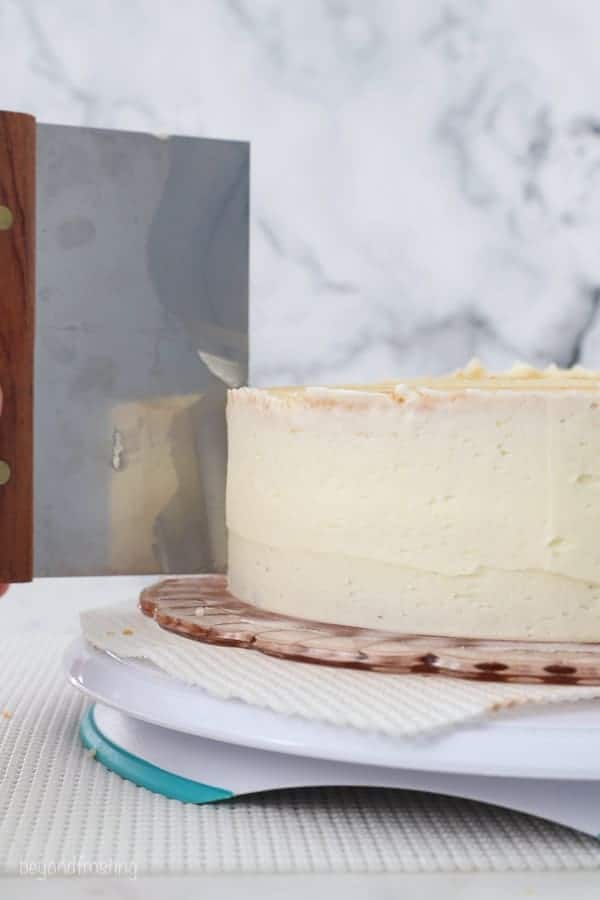
- Step 7: Frost the acme using the remaining frosting. Continue to apply the scraper or angled spatula to remove any excess frosting.
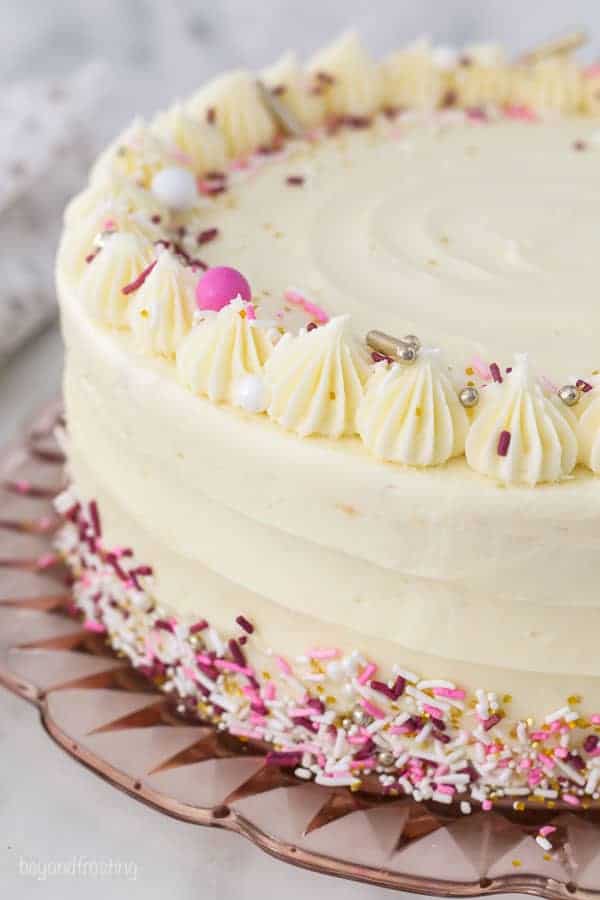
- Footstep viii: Decorate using actress frosting so add sprinkles, fruit or décor.
How to set a leaning cake
If you notice that your cake is sliding every bit you're assembling, yous can try resetting it and placing it in the fridge for fifteen-thirty minutes.
Once the block is fully stacked, I like to employ drinking straws or dowels to help concord the cake layers in place (especially if it's 4 layers or more). Drinking straws are the easiest.
Simply cut them shorter than the height of your block and apply 3-4 spaced evenly in the block. This is best done before calculation the final layer of frosting on top and so that y'all can cover the holes from the straws.
Of course, exist sure that you are starting with squeamish and fifty-fifty layers as mentioned above. You want to cut the dome off the meridian of your cake.
How to store a frosted cake
If you plan on making multiple cakes, I recommend purchasing a block carrier, which seals the cake with an closed lock. It tin likewise be a slap-up mode to transport the cake. I place some grippy material (like you would line a drawer with) on the bottom of the block carrier to prevent the cake from sliding.
You can also purchase cake boxes but annotation these are not airtight. Craft stores unremarkably have them to purchase single units, but I likewise buy them in 10-packs online.
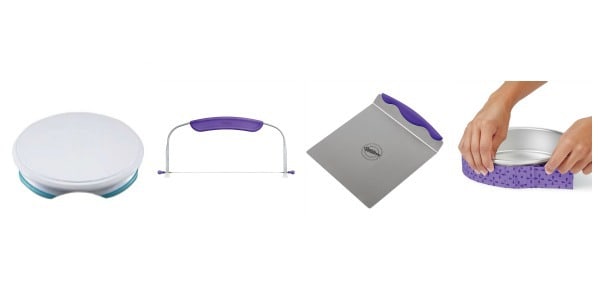
Basic tools you lot'll need
There are lots of fancy tools you could buy, merely don't necessarily need. These are the basic tools I use and love all the fourth dimension.
For the cake:
- Block pans– I recommend having three eight-inch pans
- Parchment circles or silicone mats– once I discovered the silicone mats, I stopped using parchment newspaper. You can also cut your ain parchment circles by tracing the width of the pan on piece of parchment paper and cut it out.
- Broil even stripes
To decorate the cake:
- Cake level
- Block board- I recommend using a cake board that is 1-ii inches wider than your cake.
- Block lifter– helpful for moving the layers effectually, but not required!
- Turntable
- Large pipe bags
- Large open up round piping tip or cake icer tip
- Block scraper – these come up in lots of heights and widths, different handles etc. Sometimes information technology takes time to observe 1 you like, simply it should be taller than the cake you're assembling.
- Angled spatula these come in lots of heights, the 9 or xiii-inch ones I use the most.
Choosing the right size pan
Most all my cake recipes call for eight-inch baking pans, which is a common size you lot'll discover at a local bakery. Bakeries by and large sell cakes in 6,viii,x or 12-inch sizes. Be certain your pans should be two to three inches high.
Commonly, my cakes are 3 layers. Most recipes can be adjusted to other size pans, and information technology's best to check on the individual recipe. I similar viii-inch pans because the cakes are normally taller than a 9-inch or x-inch pan and it'south the easiest size to work with.
I don't dearest 9-inch pans. I don't know if you've e'er noticed, simply most standard 9-inch pans don't have straight edges on the sides of the pan, and so the layers stack unevenly and at that place'southward ever large gaps in between. As such, I find that past 9-inch layers are e'er lopsided and unevenly broiled.
My favorite cake recipes
- Moist Vanilla Layer Cake
- The Best Chocolate Cake
- Classic Xanthous Altogether Cake
- Lemon Huckleberry Cake
- Strawberry Mascarpone Cake
- Coconut Custard Block
My favorite frosting recipes
- Perfect Vanilla Frosting
- The Best Chocolate Frosting
- Cream Cheese Frosting
- Mascarpone Whipped Foam
- Whipped Cream Frosting
More than blistering tutorials yous'll love
- How to Make Buttercream
- How to to use a piping purse
- How to decorate with pipage tips
- How to colour buttercream
- How to decorate a Buttercream Blossom Cake
Follow Beyond Frosting:
Facebook | Twitter | Pinterest | Instagram
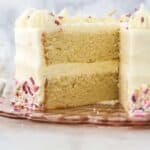
Vanilla Layer Cake
- Prep Time: 30 minutes
- Melt Time: xxx minutes
- Total Time: hour
- Yield: 12 slices
Description
With this piece of cake tutorial you'll larn to build a perfect layer cake. I'll evidence you how to ready the pans, level your cake and frost it as well.
Ingredients
For the cake:
- ii cup s (380g) granulated sugar
- ½ cup (118 ml) vegetable oil
- 3 large eggs
- 1 tablespoon (14.viii ml) pure vanilla excerpt
- ½ loving cup (118 ml) light sour cream
- 2 ½ cup due south (350 g) all-purpose flour
- 3 teaspoon s (11.two g) baking powder
- i teaspoon (5 g) salt
- 1 ¼ cup south (296 ml) milk (I use nonfat)
For the frosting
- i ane/two cup (339 thousand) (3 sticks) unsalted butter, common cold.
- 5 cup due south (650 g) powdered sugar
- 2 1/two teaspoon s (12 ml) pure vanilla extract
- ii tablespoon due south (30ml) heavy whipping cream (or milk)
Instructions
- For the cake:Preheat the oven to 350°F. Prepare 2 8-inch round blistering pans, line the bottom with parchment newspaper and grease the sides. Ready your bake even strips if desired.
- In a large mixing bowl, combine the sugar, vegetable oil, eggs and vanilla excerpt. Beat on medium speed until the eggs and oil are well incorporated and the batter is lighter in color, most 2 minutes. Scrape downwards the bowl as needed.
- Next mix in the sour foam and vanquish until well combined.
- Combine the dry ingredients in a separate bowl. Add one-half the dry ingredients, beat on low speed while pouring in half of the milk. Mix only until the flour starts to incorporate.
- Finally add the remaining dry ingredients, mixing on depression speed while pouring in the remaining milk and beating until all of the ingredients are well combined. Utilise a spatula to scrape downwardly the sides of the bowl and stir the batter from the lesser to the pinnacle to ensure it'southward well mixed.
- Separate the batter evenly between the pans, most 2 1/2 cups per each pan. Bake at 350°F for 28-32 minutes. Rotate your pans in the oven halfway through blistering.
- Exam the cake for doneness past inserting a toothpick into the middle of the cake. If the toothpick comes out make clean, you block is washed. Remove from the oven and permit to cool completely.
- For the frosting:Cut butter into pieces. Using the paddle zipper, whip the butter for 5-7 minutes, scraping downwardly the basin occasionally. Beat until the butter looks calorie-free in color.
- Add the powdered sugar 2 cups at a time, alternating in the liquid ingredients (heavy foam and vanilla). Mix on low speed until incorporated into butter then add the vanilla extract and mix to combine. Beat out for near 60-ninety seconds before adding additional powdered sugar.
- One time all the ingredients take been added, increase speed to medium-high and trounce for another 3-5 minutes to whip boosted air into the frosting.
- To assemble the cake,employ a cake leveler to cut the domes off the meridian of the cake. Place a dollop of frosting on your cake board and place the lesser layer of cake on elevation of that.
- Place near 2 cups of frosting in a large piping bag fitted with a large open round tip, or only cut off the end of the piping bag. Pipe a layer of frosting on superlative of the cake, starting at the outside edge and working your way into the heart. Spread evenly with an start spatula. Place the next layer on top.
- Use your pipe bag to fill in any gaps between your layers and to create a crumb coat. Using an offset spatula or icing smoother, wipe abroad the excess frosting, leaving yous merely plenty to coat the outside of the cake. Do non mix your nibble coating frosting back into your icing if it has cake debris in it.
- Continue to frost the height and sides of the block using your offset spatula. Once the sides of the block are covered, use you lot icing smoother to remove any backlog frosting.
Notes
Sour cream substitute: Sour foam helps keeps these cupcakes very moist, I do not recommend omitting information technology. Substitute with with non-fatty Greek Yogurt if you do not have sour cream. Total-fat sour foam is likewise workable, only I prefer low-fat or fatty-free.
To make this as a single layer, delight see my other vanilla cake recipe.
This frosting is for a 2 layer cake. The frosting recipe would need to be adjusted if y'all are making adjustments to the size of the pans or number of layers.
Baking pan substitutes:
- For two 9-inch cakes, they broiled from 28-32 minutes. Baking times will vary due to how full the pans are, type of pans and truthful oven temperature. Please notation these did "crust" a little more on the outside edge due to extended baking times and they rose quite a bite in the center, so yous'll lose more than of the "dome" of the block.
- For three 8-inch pans: split the batter evenly, almost 1 two/3 cups per each pan. Bake for twenty-23 minutes. See my Moist Vanilla Layer Block for more details.
- For 6-inch pans:a full recipe will brand 4 6-inch layers, filling each i with nearly 1 1/3 cup of concoction and baking for approximately 24-30 minutes.
- For x inch pans:I've never tested this with 10 inch pans, merely I would recommend a 2 layer cake so you even so have nice, thick layers. Trying blistering for 18-20 minutes and assessing boosted time needed from there.
Nutrition Information:
i slice
752
83.9g
236.4mg
35g
23g
106.5g
.8g
6g
111.4mg
- Category: Cake
- Method: Baked
- Cuisine: American
Keywords: Vanilla Block, Vanilla Cake from Scratch, Piece of cake Vanilla Cake Recipe, Birthday cake Recipe, Easy cake recipe with oil, How to make a cake

How To Make A Filled 13 X 9 Cake,
Source: https://beyondfrosting.com/how-to-make-a-layer-cake/
Posted by: pricedrabland1987.blogspot.com
0 Response to "How To Make A Filled 13 X 9 Cake"
Post a Comment